2014年11月24日月曜日

socz80 Papilio Pro(2)

socz80 で SD Card が読めたのでメモします。
使用したSDCC はver 3.4.0です。
[crt.asm]
   ;.org  #0x0000  
   call  _main  
   ret  

[sfr_def.h]
 #ifndef _SFR_H_  
 #define _SFR_H_  
 __sfr __at 0x00 UART_ST;  
 __sfr __at 0x01 UART_TD;  
 __sfr __at 0x01 UART_RD;  
 __sfr __at 0x20 GPIO_SW;  
 __sfr __at 0x21 GPIO_LED;  
 __sfr __at 0x30 SPI1_CS;  
 __sfr __at 0x31 SPI1_BY;  
 __sfr __at 0x32 SPI1_TD;  
 __sfr __at 0x33 SPI1_RD;  
 __sfr __at 0x34 SPI1_DV;  
 #endif  

[SD.c]
 #include "sfr_def.h"  
 struct sd_def  
 {  
  unsigned char cmd[8];  
  unsigned char res[2];  
  unsigned char buf[512];  
 } sd;  
 void uart_print (const char *fmt, ...);  
 void SD_INIT (void);  
 void SD_READ (int sec);  
 int CRC7 (unsigned char c[], int n);  
 void  
 main ()  
 {  
  int led;  
  led = 0;  
  uart_print ("hello\r\n");  
  SD_INIT ();  
  SD_READ (0);  
  while (1)  
   {  
    led++;  
    uart_print ("%04x\r", led);  
    GPIO_LED = led;  
   }  
 }  
 int  
 SD_RW (int data)  
 {  
  SPI1_TD = data;  
  return SPI1_RD & 0xff;  
 }  
 void  
 SD_INIT (void)  
 {  
  int i;  
  SPI1_DV = 6;  
  SPI1_CS=1;  
  /* dummy clock */  
  for (i = 0; i < 10; i++)  
   {  
    SD_RW (0xff);  
   }  
  sd.cmd[0] = 0x40;  
  sd.cmd[1] = 0x00;  
  sd.cmd[2] = 0x00;  
  sd.cmd[3] = 0x00;  
  sd.cmd[4] = 0x00;  
  sd.cmd[5] = CRC7 (sd.cmd, 5) | 1;  
  SPI1_CS=0;  
  for (i = 0; i < 6; i++)  
   {  
    SD_RW (sd.cmd[i]);  
   }  
  do  
   {              /* response */  
    sd.res[0] = SD_RW (0xff);  
   } while (sd.res[0] == 0xff);  
  SPI1_CS=1;  
  sd.cmd[0] = 0x41;  
  sd.cmd[1] = 0x00;  
  sd.cmd[2] = 0x00;  
  sd.cmd[3] = 0x00;  
  sd.cmd[4] = 0x00;  
  sd.cmd[5] = CRC7 (sd.cmd, 5) | 1;  
    SPI1_CS=0;  
      for(;;){  
    for (i = 0; i < 6; i++)  
     {  
      SD_RW (sd.cmd[i]);  
     }  
    do  
     {            /* response */  
      sd.res[0] = SD_RW (0xff);  
     } while (sd.res[0] == 0xff);  
           sd.res[1] = SD_RW (0xff);  
       if(sd.res[0] ==0||sd.res[1] ==0)  
        break;  
      }  
    SPI1_CS=1;  
 }  
 void  
 SD_READ (int sec)  
 {  
  int i;  
  sd.cmd[0] = 0x51;  
  sd.cmd[1] = 0x00;  
  sd.cmd[2] = 0x00;  
  sd.cmd[3] = sec >> 8;  
  sd.cmd[4] = sec;  
  sd.cmd[5] = CRC7 (sd.cmd, 5) | 1;  
  SPI1_CS=0;  
  for (i = 0; i < 6; i++)  
   {  
    SD_RW (sd.cmd[i]);  
   }  
  do  
   {              /* response */  
    sd.res[0] = SD_RW (0xff);  
   }  
  while (sd.res[0] == 0xff);  
  do  
   {              /* start byte */  
    sd.res[1] = SD_RW (0xff);  
   }  
  while (sd.res[1] != 0xfe);  
  for (i = 0; i < 512; i++)  
   {  
    sd.buf[i] = SD_RW (0xff);  
   }  
  /* crc1 crc2 */  
  SD_RW (0xff);  
  SD_RW (0xff);  
  /* dummy clock */  
  SD_RW (0xff);  
  SPI1_CS=1;  
  for (i = 0; i < 512; i++)  
   {  
    if ((i & 15) == 0)  
     uart_print ("\n%03x", i);  
    uart_print (" %02x", sd.buf[i]);  
   }  
  uart_print ("\n");  
 }  
 void  
 SD_WRITE (int sec)  
 {  
 }  
 //------- CRC7 by K.I 051020 --------  
 int  
 CRC7 (unsigned char c[], int n)  
 {  
  int i, j;  
  unsigned char d, r = 0;  
  for (i = 0; i < n; i++)  
   {  
    d = c[i];  
    for (j = 0; j < 8; j++)  
     {  
      if ((d & 0x80) ^ (r & 0x80))  
       r = (r << 1) ^ 0x12;    // reverse of 0x48  
      else  
       r <<= 1;  
      d <<= 1;  
     }  
   }  
  return (r & 0xFE);  
 }  

[build.bat]
 sdasz80 -plosgff -o crt.rel crt.asm  
 sdcc -mz80 -c print.c   
 sdcc -mz80 -c SD.c   
 sdcc -mz80 --code-loc 0x100 --no-std-crt0 -Wlcrt.rel SD.rel print.rel  

cmd0

cmd17 コマンド受付

cmd17 データの開始 0xFE

cmd17 最終データ部 0xaa 0x55

セクタ#0


転送ツールとSDCard Read サンプル
https://www.dropbox.com/s/nm0vcrq0nfpjvrd/D2tool.zip?dl=0
https://www.dropbox.com/s/fpc7u1qoig1z1ug/sample_sdcard.zip?dl=0

socz80 Papilio Pro(1)

秋月電子で販売中のPapilio Proで socZ80 が動作したのでメモします。
物は
http://akizukidenshi.com/catalog/g/gM-06926/
これです。


socz80は
http://sowerbutts.com/socz80/
これです。
シールドはなくても、socz80は動作しますが、あったほうが気合いが入ります。


CPM disk imageをツールでSDRAMの転送後、rwrite コマンドで SDRAM->SPI FLASHに格納します。

rread コマンドで SPI FLASH->SDRAMに取り出し、rboot コマンドで CPMを起動します。

なお、disk image の転送ツール(write_phy_mem)はsocz80に添付されていますが、python で書かれており、Linuxを想定しています。
Windowsで使うには、不便なので、自家製のツールをつくり、転送に利用しました。
転送ツール
https://www.dropbox.com/s/s6fzqmcrcb8wzdx/D1tool.zip?dl=0

2014年8月15日金曜日

Em::Blocks/VirtualStaterKit(FM3 QEMU)

VirtualStaterKit を Em::Blocksで動作したのでメモしておく。
Spansionは FM3シリーズ(Cortex-M3)のQEMU環境を配布してる。
https://www.spansion.com/JP/Support/microcontrollers/development-environment/pages/virtual-starter-kit.aspx
開発環境はIAR EWARMとCodeBenchがお薦めらしい。

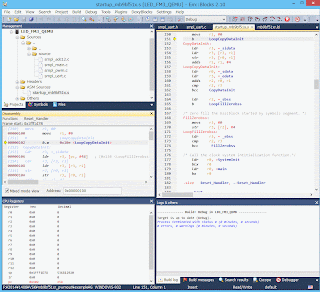
ここでは Em::Blocks でデバッグできることを示す。

VirtualStarterKit.bat を起動する。
Teraterm で localhost TCP:1204 で接続。

Em::Blocksでdebug接続する (TCP:1234)。

Em::Blocks でDebug Run

Em::Blocks の設定例(Project->Build Options...)

Em::Blocks の設定例(Debug->Interfaces)
gdb server は launchpad gcc のもの(arm-none-eabi-gdb)を流用しました。
https://launchpad.net/gcc-arm-embedded

VirtualStartKit.bat の修正


configuration\cpu.ini の修正(GDB Server接続を有効化)
GDB 接続しない場合は コメントのままとする

2014年7月23日水曜日

マルチタスク2::SH7216 STM32F30x

hamayan さんのマルチタスク2を SH2A:SH7216 で動作させたので差分をメモします。

GR-SAKURAではじめる超お手軽マルチタスク2
http://hamayan.blog.so-net.ne.jp/2012-12-27

修正箇所はdispatcher_sh2a.srcのみ
 ;/****************************************************************************/  
 ;/* コンテキストの切り替え処理                        */  
 ;/*                                     */  
 ;/* designed by hamayan                           */  
 ;/*             Copyright (C) 2012 hamayan All Rights Reserved. */  
 ;/****************************************************************************/  
  .export _swi_ctx ;/*実行コンテキストの切替*/  
  .export _sta_ctx ;/*コンテキストをロードし、タスクを開始*/  
 ;/************************************************  
 ; コンテキストをロードし、タスクを開始  
 ; void sta_ctx(  
 ;  void *exe ) //実行コンテキストの保存先  
 ;************************************************/  
  .section P,CODE,ALIGN=4  
 _sta_ctx:  
  sts   pr,@-r15  ;/* pr 退避 */  
  mov.l  @r4,r15   ;/*スタックポインタ設定*/  
  movmu.l @r15+,r6  ;/*r6-r14,prを復帰*/  
  rts/n  
 ;/************************************************  
 ; 実行コンテキストの切替  
 ; void swi_ctx(  
 ;  void *pre,  //現在のコンテキストの保存先  
 ;  void *post) //切り替えるコンテキスト  
 ;************************************************/  
  .section P,CODE,ALIGN=4  
 _swi_ctx:  
  movmu.l r6,@-r15  ;/*r6-r14,prを退避。r6が最も若いアドレスになる*/  
  mov.l  r15,@r4   ;/*スタックポインタ保存*/  
  mov.l  @r5,r15   ;/*スタックポインタ復帰*/  
  movmu.l @r15+,r6  ;/*r6-r14,prを復帰*/  
  rts/n  
  .end  
 ;/****************************************************************************/  
 ;/* designed by hamayan                           */  
 ;/*             Copyright (C) 2012 hamayan All Rights Reserved. */  
 ;/****************************************************************************/  
mul_tsk.c::reg_tsk() を修正したくないので、
R6,R7は余分ですが、退避、回復させています。

また、 STM32F30x での GCC版 のコードもメモしておきます。

修正箇所はdispatcher_cm3.sのみ
 ;/****************************************************************************/  
 ;/* コンテキストの切り替え処理                        */  
 ;/*                                     */  
 ;/* designed by hamayan                           */  
 ;/*             Copyright (C) 2012 hamayan All Rights Reserved. */  
 ;/****************************************************************************/  
  .syntax unified  
  .arch armv7-m  
  .globl swi_ctx ;/*実行コンテキストの切替*/  
  .globl sta_ctx ;/*コンテキストをロードし、タスクを開始*/  
  .section .text  
 ;/************************************************  
 ; コンテキストをロードし、タスクを開始  
 ; void sta_ctx(  
 ;  void *exe ) //実行コンテキストの保存先  
 ;************************************************/  
 sta_ctx:  
  push {lr}     ;/*lrを退避*/  
  ldr r13,[r0]   ;/*スタックポインタ設定*/  
  pop {r4-r12,pc} ;/*r4-r12,pcを復帰*/  
 ;/************************************************  
 ; 実行コンテキストの切替  
 ; void swi_ctx(  
 ;  void *pre,  //現在のコンテキストの保存先  
 ;  void *post) //切り替えるコンテキスト  
 ;************************************************/  
 swi_ctx:  
  push {r4-r12,lr} ;/*r4-r12,lrを退避。r4が最も若いアドレスになる*/  
  str r13,[r0]   ;/*スタックポインタ保存*/  
  ldr r13,[r1]   ;/*スタックポインタ復帰*/  
  pop {r4-r12,pc} ;/*r4-r12,pcを復帰*/  
  .end  
 ;/****************************************************************************/  
 ;/* designed by hamayan                           */  
 ;/*             Copyright (C) 2012 hamayan All Rights Reserved. */  
 ;/****************************************************************************/  

STM32Fシリーズの統合開発環境はEm::Blocksが便利です。
デバッガーにSTLinkが使えるのがうれしい。
http://www.emblocks.org/web/

2014.07.23

2014年7月14日月曜日

SEV SH7216 (2)

Windows8.1 で COM_class.zipがインストール失敗する理由を探ってみた。

http://blogs.msdn.com/b/jpwdkblog/archive/2013/12/27/dpinst-log.aspx
の記事を見ながら追跡してみたもの。
dpinst_x64.exeを実行すると

  • DPINST.LOG
    INFO: ENTER: DriverPackagePreinstallW
    INFO: RETURN: DriverPackagePreinstallW (0xE0000247)
    INFO: Returning with code 0x80010000M
  • setupapi.dev.log
    inf: Could not find include INF file "layout.inf". Error = 0x00000002
    ! sig: Verifying file against specific (valid) catalog failed! (0x00000057)
    ! sig: Error 87: The parameter is incorrect.
    ! sig: Verifying file against specific Authenticode(tm) catalog failed! (0x800b0100)
    ! sig: Error 0x800b0100: No signature was present in the subject.
    !!! sig: Driver package catalog file does not contain a signature, and Code Integrity is enforced.
    !!! sig: Driver package failed signature validation. Error = 0xE0000247
    !!! sig: Driver package failed signature verification. Error = 0xE0000247
    !!! sto: Failed to import driver package into Driver Store. Error = 0xE0000247

    2013.07.14
  • 2014年7月13日日曜日

    SEV SH7216 お薦めできない理由

    この記事は個人の感想です。
  • SH7216 だから当然Ether PHY実装されている?
    PHY 実装なし。
  • FDTv409r02でUSB経由(Generic Boot USB Direct)でファームアップデート可能?
    可能ではあるが Windows8.1上では安定しない。4回に1回ぐらいの成功率。
  • SH7216用COMクラスは64bit対応?
    http://japan.renesasrulz.com/partner_tools/marutsu/m/sh7216_board/default.aspx
    ここで配布しているのは、なんちゃって署名!?、Windows8.1ではインストールできない。
     Windows XPではインストールできた。

    正しく署名されたUSB CDC Driverでの確認。
    NXP LPC11U35用のVCOM で確認してみた。
    SetUsbInfo.h を修正

  • USB Bootが安定しない理由
    PB14 がpullupされていないから?
    pullupしてみたが現象変わらず!

    GR-SAKURAのほうが、USB Bootも安定している、Etherが使える分楽しめる。
    2014.07.13
  • 2014年6月25日水曜日

    STM32F429 uclinux(2)

    修正個所と、設定変更箇所を図で示します。
    u-boot/include/configs/stm32429-disco.h
    uclinux/arch/arm/mach-stm32/iomux.c
    uclinux/arch/arm/mach-stm32/spi.c

    2014.06.26

    2014年6月24日火曜日

    STM32F429 uclinux

    emcraft さんのソースをいじって、なんとかSD Cardがrootfs でmountできた。
    しかし、github上にはすでに、動作するものがあったようだ。
    https://github.com/Lefinnois/stm32f429-linux-builder

    主な変更箇所は
    u-boot:
    include/configs/stm32429-disco.h
    root=dev/mmcblk0p1 rootdelay=1 rdinit=/sbin/init
    uclinux:
    arch/arm/mach-stm32/spi.c
    arch/arm/mach-stm32/iomux.c

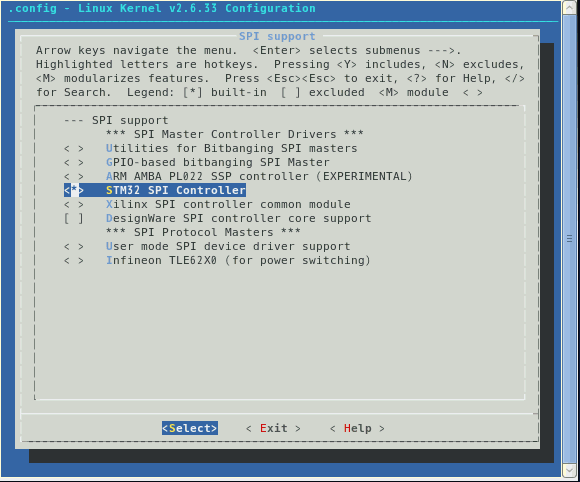
    あとは make menuconfig で
    http://blackfin.uclinux.org/doku.php?id=linux-kernel:drivers:spi_mmc
    のような感じに設定


    2014.06.24